“The Machine”: A Conversation With a Slot Machine
Right after my graduation (literally, the day after) I went to Berlin for the entire month of July to participate in a program at the School of Machines, Making and Make-believe. The “School of Ma” is an independent school at the intersection of art and technology, run by Rachel Uwa. Every month, a course is organized around a specific theme, and multiple instructors are invited to come and teach to a dozen or so students.
The course I took part in was called “Winners and Losers”, subtitled “Interactive electronics, play & experimental games”. It started with a two-weeks primer on electronics and the use of microcontrollers, followed by one week on motors and mechatronics in general, and finished with a project in small groups, spanning the fourth week. Alice Stewart was the teacher for the first two weeks, while Kati Hyyppä and Niklas Roy taught the third week and supervised the projects.
“The Machine”
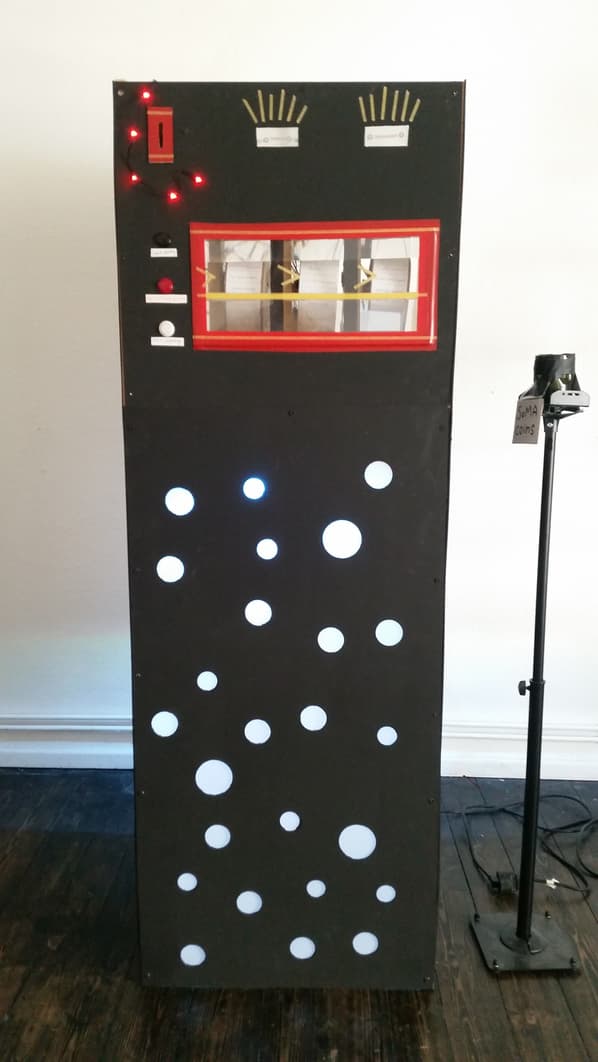
Our project—called “The Machine”—is a kind of slot machine generating random sentences. The “players” are invited to insert a (fake) coin, select the kind of interaction they desire—“poetry”, “question” or “challenge”—and then watch the reels turn and stop on three phrases which, when combined, form a sentence. The project is a collaboration between myself, Anna Brynskov, and Maryam Aghajani. Anna is a student in digital design and a filmmaker from Aarhus, Denmark; Maryam is an architectural lighting designer from Canada, working in Berlin.
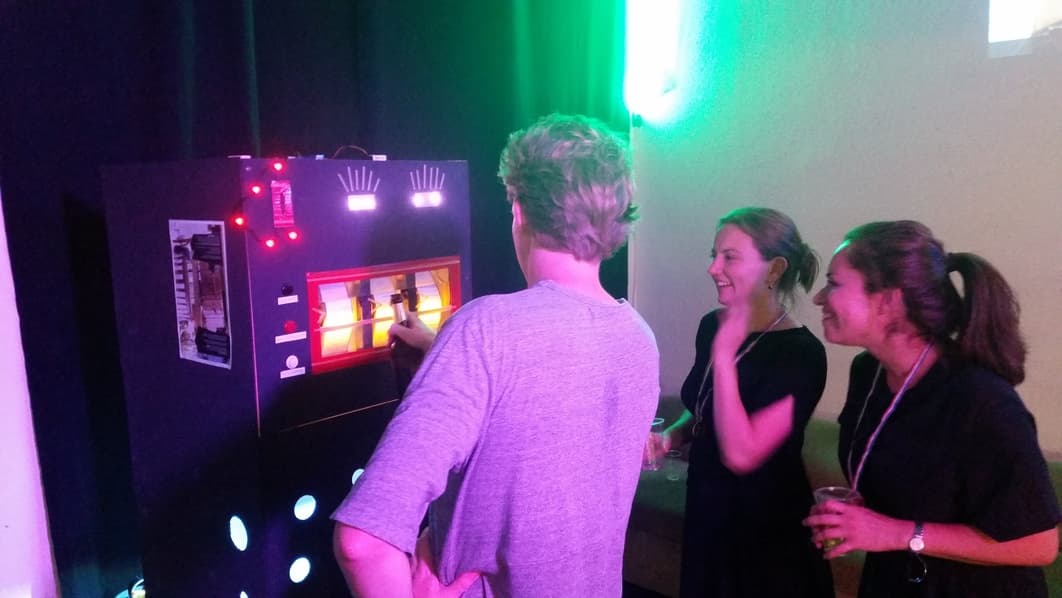
To better demonstrate how it works, here’s a short video of me using the Machine. After I insert a coin and I press the “poetry” button, the reels immediately start turning. Eventually, they stop on three random phrases of the “poetry” type (written in black), and the LED eyes blink.
Making Of
Because we had complementary skills, we tended to gravitate towards what we each did best. Being the computer scientist of the group, I took care of most of the programming. I also built the motorized reels and designed the electronics that control them.
Maryam, as a skilled designer, created the entire body of the Machine, from the wooden frame to the finishing paint—and of course, the lighting. She did an amazing job, giving the finished product a distinctive aesthetic.
Anna was fairly versatile in this project: She designed parts of the electronics along with the Arduino code that came with it; she helped Maryam with the aesthetics; and finally, thanks to her literary background, she wrote the poetry that make up the core of the interactions with the Machine.
The obvious downside of this approach is that none of us actually worked on every aspect of the project. For example, I did nothing to help with the design and the woodwork, while Maryam didn’t do any of the electronics and programming. In retrospect, I think it would have been more fun for everyone to have a more equitable distribution of tasks. However, I would also say that the time constraints and the pressure made this difficult to achieve.
The week of development and crafting culminated in a small event organized at the Liebig12 space in Berlin, where each team showcased their project. Dozens of visitors came by throughout the evening of July 27 to play the various experimental games presented there. The feedback was very positive, and it was a lot of fun to see so many people interact with the installation.
The Machine’s Inner Workings
I will now delve into the more technical aspects of the project. As an overview, here’s a list of the various components that make up the Machine:
- A painted wooden box, housing all the components, with a removable wooden frame holding the reels and the Arduino microcontrollers
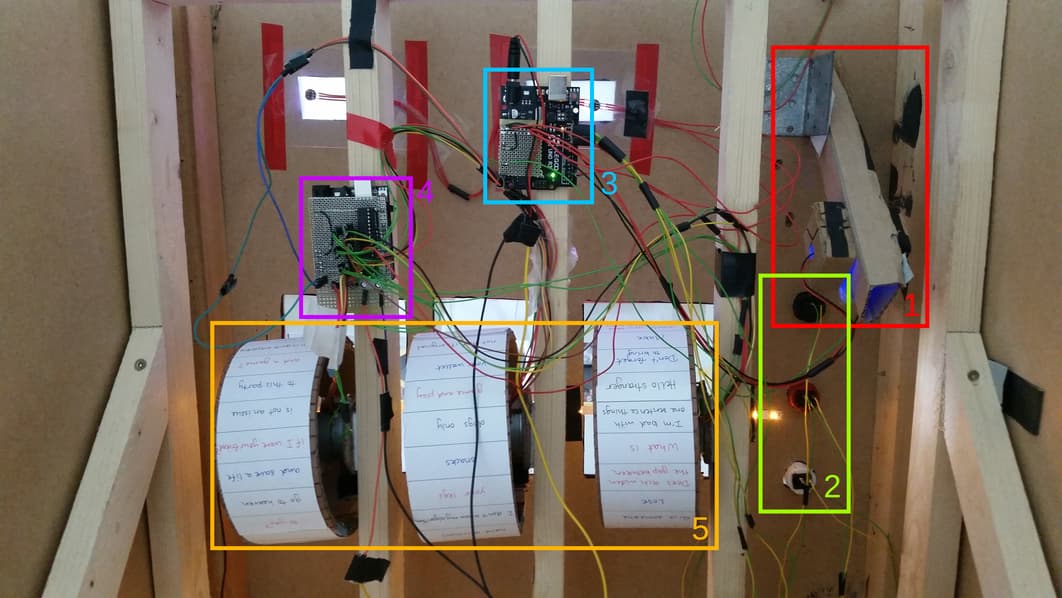
- A coin slot (1), attached to the wooden box, made with an LED and a light detector
- Three buttons for sentence type selection (2)
- Two Arduino Uno, one serving as a motor driver (3), and the other (4) handling the user interface and the random sentence generation
- Three cardboard reels (5) with phrases on them, each powered by a stepper motor
- A set of four Neo-Pixels, acting as “eyes” for the Machine
- A light with changing hue, attached in the box, creating ambient lighting
- An LED strip, attached to the inside near the reels, lighting up the current sentence
- An additional set of Neo-Pixels around the coin slot, lit up by a third Arduino Uno
Like I said, I was only involved in the reels, the electronics and the programming. Hence, I will restrict my technical account of the project to these aspects.
The Reels
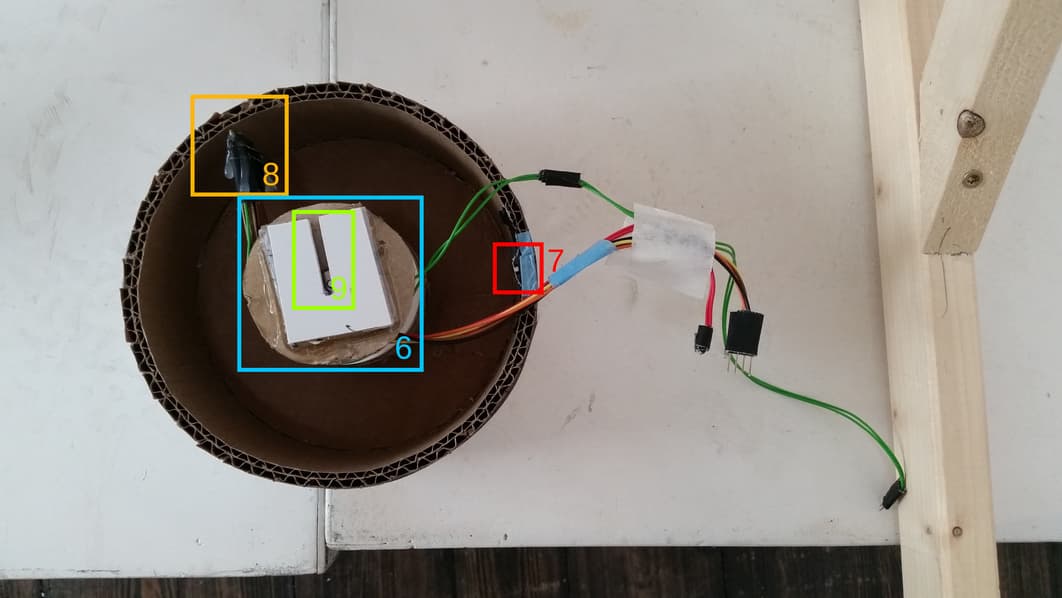
Let’s start with the reels. The structure of each reel is made of a long piece of bent cardboard attached to a disk. Glued to its axis is a stepper motor (6), which is a DC motor that moves in discrete steps—in our case, 96 steps of 3.75°. Thanks to this, we gain the ability to control exactly by how much a reel rotates. Then, given a reference point, we can ask the motor to rotate such that any specific phrase is facing the user: If we know the motor is currently 20 steps from the reference point, and we want to show a phrase that is 55 steps from the reference, we just order the motor to rotate by 25 steps.
Therefore, the critical part is to reliably determine a reference point. Indeed, when the Machine is turned on, each reel can be in any position, and we have no way of knowing which. To solve this problem, we used a combination of a small magnet (7) and a Reed switch (8), which is a switch that closes when inside of a magnetic field. When the Machine is booted, each reel starts rotating, stopping when the Reed switch is facing the magnet. Once this happened, we know for sure the exact position of the reel, and we can use it as a reference point.
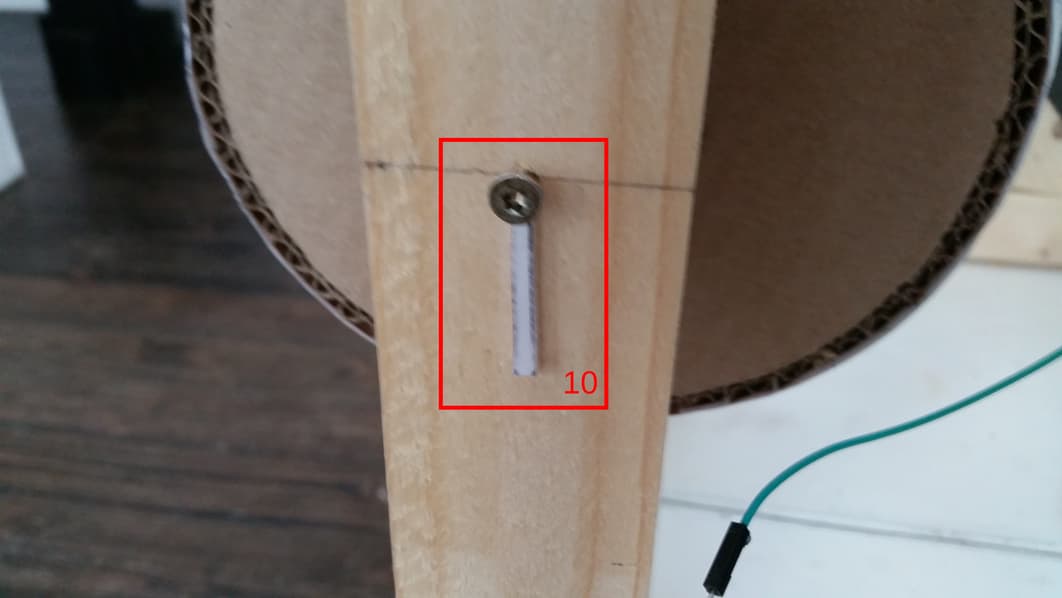
Finally, a slit (9) on the axis provides an easy way of attaching and removing the reel from a screwhead (10) on the support:
The Motor Driver Arduino
Because we needed more pins than can fit on a single Arduino Uno, we split the tasks between two Arduinos that communicate over two pins through I2C. I2C is a common protocol for communication between integrated circuits, and it’s available by default in the Arduino “Wire” library. In I2C, one Arduino is said to be the “master”, while the other is the “slave”. The master can either send a message to the slave, or it can ask the slave for a message. The slave, in return, can receive messages, and respond to a request from the master. In this context, a message is simply a string of characters or bytes.
The slave Arduino (3) was designed to be a simple motor driver for controlling the three reels. It constantly listens for a command to be sent as an I2C message. When that happens, if the reel specified in the command is not busy, it executes the task; otherwise, the command is ignored. Additionally, it can be asked by the I2C master to give the state of each motor: Idle or busy.
Among the possible commands, the main ones are “Calibrate”, which tells a reel to seek the magnet with the Reed switch, and “RotateSeek”, which tells a reel to rotate a specific number of turns, and then seek a specified position corresponding to some phrase. Directly seeking a phrase without rotating a few turns would work as well, but it’s way less exciting to watch. If you look at the code, you’ll find other commands (e.g. “Rotate”, “Seek”, “Next”, “Previous”) that were introduced for debugging purposes.
Formally, commands are expressed as simple 4-bytes I2C messages:
[command code][motor ID][parameter 1][parameter 2]The first two bytes, “command code” and “motor ID”, respectively identify a command and a reel. Depending on the command, the next couple of bytes can specify the number of turns and/or the specific phrase to seek.
As an example, here is the command to tell motor 1 to rotate 3 turns and stop on position 43:
6 1 3 43where 6 is the command code that identifies the
“RotateSeek” command.
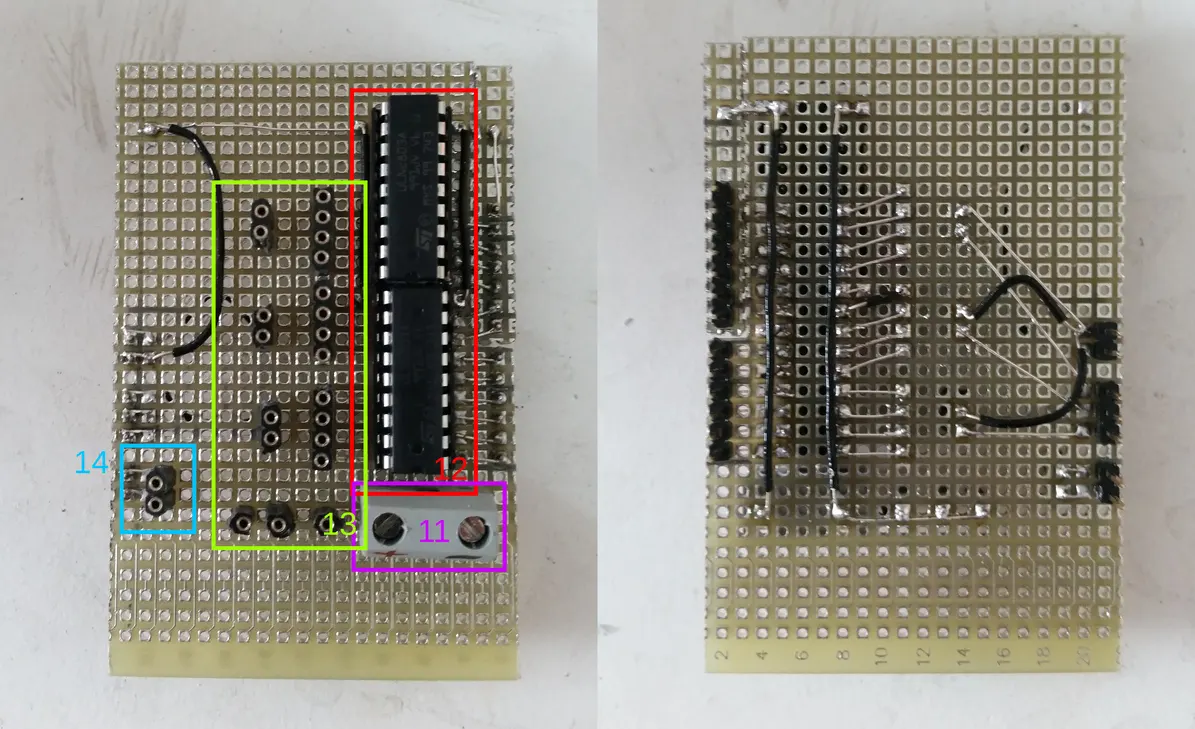
Two transistor arrays were necessary to provide power to the stepper motors, so we decided to put them on a custom Arduino shield for the motor driver. The process took a great part of the day, but I was quite proud of the result. It contains a DC power input (11), the two transistor arrays (12), and many additional pins in which to plug the motors (13) and I2C wires (14):
The Controller Arduino
The entire logic of the Machine is contained within the master Arduino (4), which we called the “controller”. It manages the coin slot, the buttons, the “eyes”, and the commands sent to the motor driver. Its behaviour is fairly simple: At first, it waits for a coin to be inserted into the the coin slot. When that happens, it waits for a button to be pressed. Depending on the button, it then selects one phrase at random for each reel, and sends three “RotateSeek” commands (one for each motor) to the driver Arduino. Then, it waits, asking the slave regularly whether the reels have stopped turning. When the motor driver replies that they have, the controller flashes the LED eyes, and becomes ready again for another coin and button press.
The Coin Slot
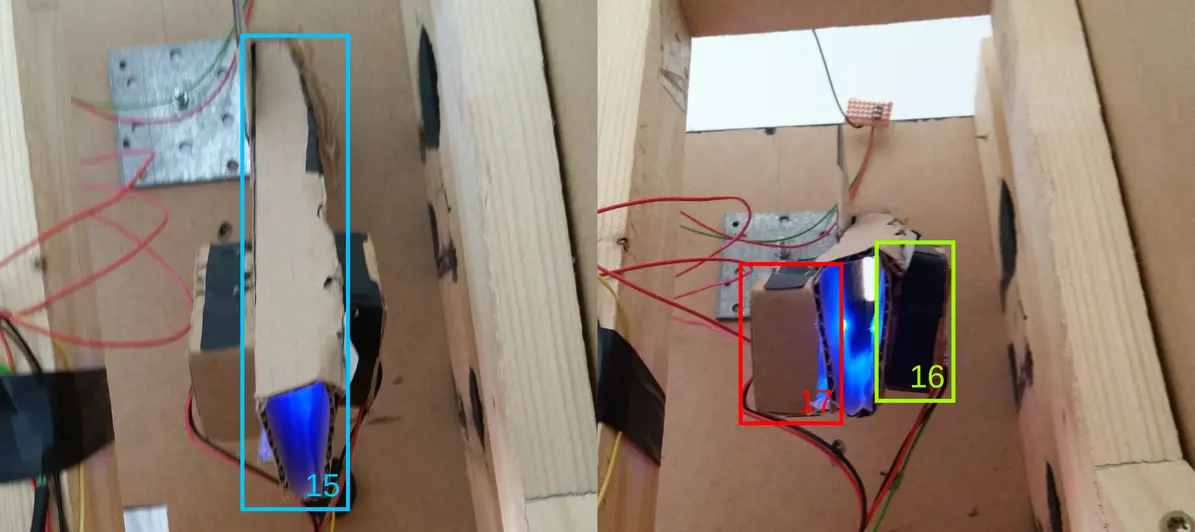
I’ll finish with a small comment on the coin slot (1), which Anna made. It is a cardboard tube (15) attached to the front of the machine, containing a light sensor (16) facing an LED (17). When a coin is dropped through the tube, it momentarily blocks the light from the LED as it falls, triggering the light sensor.
Rather than have people use real money, we provided our original “SoMA” coins, the unofficial School of MA cardboard currency (our ICO will start soon). Fun anecdote: During the evening, we discovered that the coin slot was sensitive enough to be triggered by a mini pretzel. Thankfully this had no effect on the exchange rate of SoMA coins.
Conclusion
While stressful and/or difficult at times, I really enjoyed this project. Being a software person, it had been a while since I’d done anything as hands-on as this; after two years of Master in CS, the experience was positively refreshing. In addition, the final evening was amazing: Observing people interact with the installation and receiving feedback from them was incredibly rewarding.
I’d like to give a special thanks and shout-out to my teammates, Anna and Maryam. Getting to work with the two of you was among the best parts of this experience. I’m glad we stuck together through some of the harder stuff, and I feel so proud of what we managed to accomplish together.
Additional technical details, along with the full source code, can be found on the GitHub repository for the project.